17.To deactivate the other chemistry options, select Model|PHAST Chemistry Options… and uncheck the checkboxes for Use equilibrium phases, Use exchange, Use gas phases, and Use solid solution. Leave the other three checkboxes checked. Click OK to close the dialog box. Then select Data|Edit Data Sets… again. Note that the data for Chemistry_Initial_Equilibrium_Phases, Chemistry_Initial_Exchange, Chemistry_Initial_Gas_Phase, and Chemistry_Initial_Solid_Solutions are all now classified under Optional|Chemistry indicating that they are not being used. Click Close to close the dialog box.
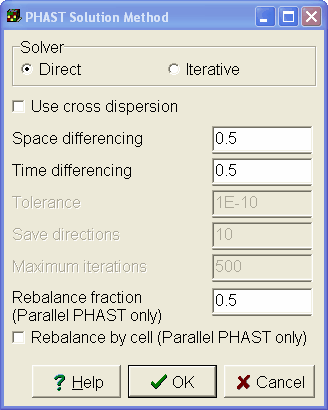
18.The next step is to set up the solution method. Select Model|PHAST Solution Method… Click the Direct radio button and set the Space differencing and Time differencing both to 0.5 (fig. 47). Click OK to close the dialog box.

Figure 47. PHAST Solution Method dialog boxes showing how to set up the solution method for example 1.
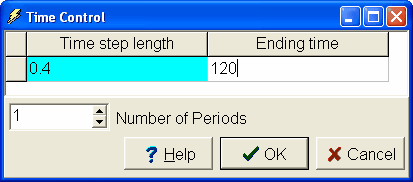
19.The model has a duration of 120 seconds with time steps lasting 0.4 seconds. Select Model|PHAST Time Control… and set the Time step length to 0.4 and the Ending time to 120 (fig. 48). Click OK to close the dialog box.

Figure 48. PHAST Time Control dialog box showing how to set up the time control for example 1.
20.The final step in setting up the model is to set up the print frequency. Select Model|PHAST Print Frequency… The units of all the items that will be changed are seconds. Click on the Units for Flow rates in boundary condition cells. The hold down the Shift key on the keyboard and click on the Units for XYZ Wells. All the Units will be selected and the combo box above the units will become enabled. In the combo box above the units, select "seconds" and the units for all the selected cells in the table will change to seconds. For time 0 set HDF chemistry to 10 seconds and XYZ chemistry to 0 seconds. (The frequency edit box for HDF chemistry was initially disabled because the default unit was end. Changing the units to seconds enabled the frequency edit box.) Click the Add button to add another time at which to specify the print frequency. Resize the dialog box to completely show the new columns. In the new column set the time to 60. Also set Force chemistry print to 60 seconds, Velocities to 60 seconds and XYZ chemistry to 60 seconds. Note that HDF chemistry for time = 60 has a value of 10 seconds. This value was copied from the previous time when the Add button was clicked. Click OK to close the dialog box. Select File|Save to save the model.