3H/3He Noble Gas Sampling
In the past, the Noble Gas Lab of Lamont-Doherty Earth Observatory has informed the Reston GW Dating Lab that some of the He samples collected by USGS projects have not been properly sealed. To seal the copper tube, the clamp on the copper tube must make contact at the outer ends so that light can not be seen through the contact area. The portion of the clamp that seals the copper tube will not close completely. The sealing area of the clamp is designed with clearance for a proper copper seal while eliminating the possibility of cutting the copper off.
USGS staff collecting groundwater samples in copper tubes for 3He/4He and/or noble gases have access to training at the Field Methods for the Collection of Water Quality Samples courses at the UGGS Office of Employee Development in Denver. Training is also available by request from the USGS Noble Gas Lab in Denver or the USGS Ground Water Dating Lab in Reston. Both the USGS and Lamont Doherty seek to maintain high standards for collection of all samples and encourage sample collectors to seek training.
Proper collection of a water sample for 3H/3He and noble gases involves:
- Filling a copper sample tube, in duplicate, that is used for noble gas analysis, helium and neon analyses, and determination of the 3He/4He isotope ratio (δ3He) of dissolved helium.
- Filling two 500cc bottles, which are used for tritium determination by helium ingrowth.
Safety-coated 500cc glass bottles with polycone seals are recommended for the tritium sample, though high-density polyethylene bottles with polycone seals may be substituted. If glass bottles are used, a headspace of several cc's should be left in the bottle to prevent breakage on warming due to expansion. The water samples for helium and neon determinations are collected in crimped copper tubes (3/8-inch diameter, 30-inch length, containing about 40 cc of water). These sample tubes with the clamps are prepared and owned by Lamont-Doherty Earth Observatory. Both the tritium and helium samples should be collected in duplicate. The duplicate water sample for tritium determination (duplicate 500cc bottle) should be retained at the submitter's office. Both copper tubes should be submitted for each sample.
The copper tube can normally be flushed and filled within 5 minutes at a 500ml per minute sample flow rate. Remove and discard the plastic caps that cover the ends of the copper tube, taking care not to scratch or bend or otherwise damage the ends of the copper tube. Damage to the ends of the copper tube may prevent proper attachment of the sample tube to the vacuum extraction line for sample preparation at the contract laboratory. The copper tube, which is fixed in an aluminum channel holding the stainless steel clamps, is connected to a closed path from the sample pump. The connection to the pump can be of almost any material including plastic, rubber, Teflon, or metal tubing, providing that all connections are airtight and will not come loose when back pressure is applied during closing of the clamps. Clear plastic tubing (Tygon) is preferred because one can visually observe whether air bubbles are present in the water line. It is recommended that connections be secured with stainless steel hose clamps, again being careful not to damage the end of the copper tube. The length of connection tubing from the pump reel or other connection point should be kept short to minimize the possibility of degassing in the water sample prior to sealing the copper tube.
Any trapped air or formation of gas bubbles in the copper tube water sample will cause erroneous results. Back pressure is normally applied to the discharge end of the copper tube during flushing to minimize degassing. Figure 1 shows a diagram of the sample aparatus with plastic inlet tubing attached. The sample collector will need to obtain a small valve and suitable tubing to attach the valve to the discharge end of the copper tube. Both water flow and back pressure on the sample should be increased if gas bubble formation is observed. Back pressure of approximately 1 atmosphere, 14 psi, is normally sufficient to prevent gas bubble formation in a ground-water sample. However, in general, to prevent gas bubble formation, the back-pressure applied must exceed the internal pressure of the dissolved gases in the water sample.
Figure 2 (A-D) shows photographs of the equipment used to take the sample. Figure 2A shows the copper tube in an aluminum channel with stainless steel clamps, a 1/4-inch copper tube used to connect to the pump, and back-pressure valve. Figure 2B shows the parts of Figure 2A connected for sampling and a 500cc safety coated glass bottle with polycone seal for collection of a tritium sample. Figure 2C shows the back pressure valve connected to the outlet end of the copper tube with a section of clear plastic tubing for viewing bubbles if present. Figure 2D shows the ends of properly sealed copper tubes (note the centering of the tubes in the clamps).
A socket wrench is typically used to turn the bolts that close the clamps. Prior to turning the bolts, the entire line from the well through the copper sample tube should be tapped to dislodge any gas bubbles that may be in the line or copper tube. During the tapping process, the copper tube should be held at an approximate 45-degree angle with discharge pointing up, to assure that gas bubbles, if present, will be completely flushed. This tapping procedure normally requires about 1 minute to complete. Once satisfied that water flowing through the copper tube is free of any gas bubbles, the socket wrench is used to close the bolts on the clamps, beginning with the bolts at the discharge end. Before turning the bolts, be sure to position the copper tube in the approximate center of the clamp. There are two bolts on each clamp. Turn the bolts in successive order back and forth to tighten the clamp until firmly closed so that the blades of the clamp close approximately evenly. The clamps are machined to leave about a 1-mm space when the bolts are turned all the way down and the clamp is closed on the ends. After tightening the discharge end bolts, tighten the inlet end bolts in the same manner, again centering the copper tube in the clamp. When done, double check to be sure that all bolts are tight. The sample is then complete and the copper tube can be disconnected from pump.
Remove the back-pressure valve from the discharge end of the copper tube. Precautions should be taken not to scratch or otherwise damage the ends of the copper tubes. If waters are corrosive, such as seawater or other saline or acidic waters, the ends of the copper tubes should be washed with dilute water to prevent corrosion. If the tubes were received with plastic caps protecting the ends, do not replace the caps after sample collection. Place the channels in the crate for storage and shipping with the open side facing up. Additional instructions on ground-water sampling for noble gases provided by Lamont-Doherty Earth Observatory appear at the end of this document.
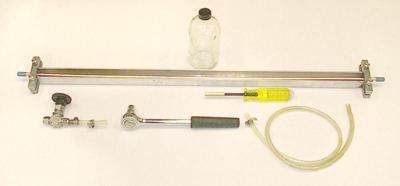
Figure 2a. Copper Tube in Aluminum Channel
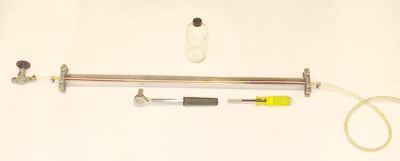
Figure 2b. Parts Connected for Sampling
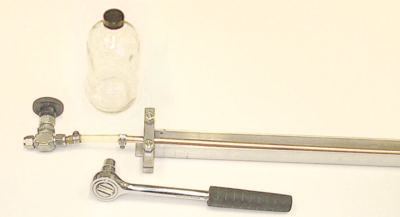
Figure 2c. Back-Pressure Valve Connected
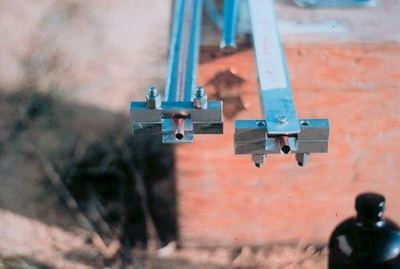
Figure 2d. Properly Sealed Copper Tubes and tritium bottles
USGS personnel will be responsible for proper collection of water samples, including (1) care in avoiding possible damage to ends of sample tubes which might preclude proper connection to laboratory high-vacuum extraction lines, and (2) exclusion of gas bubbles during sample collection. The contract lab will report samples that could not be extracted or analyzed because of improperly sealed sample containers and/or damaged sample containers. Improperly collected samples, such as samples containing gas bubbles, are usually not detected until the analysis of noble gases is made. Therefore, in most cases, the sample submitter will be charged the full price of analysis for improperly collected samples, even though no age can be determined.
Reporting of Results
Results will be reported to the submitter as they are received from the contract laboratory. The submitter should carefully review these results and follow with questions to the contract laboratory through cfc@usgs.gov.
Questions
Questions about collection and submittal procedures, or information about sample status should be directed to the GW Dating Lab (cfc@usgs.gov) 703-648-5847. Technical information on interpretation of Tritium/Helium-3 age can be found at http://water.usgs.gov/lab/.
Additional Information from Lamont-Doherty Earth Observatory
WARNING. Watch out for gas bubbles in the plastic tubing! Make sure there is no contact of the water with air before you take the sample.
1. SAMPLER PREPARATION
Write the sample location, date, and time, on the aluminum channels with a waterproof marker. Mark the channels before you begin to draw water through the sample container. Take duplicate samples.
Both ends of the aluminum channel have clamps to hold a piece of copper tube. They may rattle loose during shipment. These clamps should be finger-tightened to hold the copper tube firmly on center in the aluminum channel (Figure 1).
Use a valve on the discharge end of the copper tube to apply back pressure and discourage degassing of the sample.
2. FLUSHING
Open the pressure valve completely. Hold the copper sampler vertically (pressure valve UP) with one hand and the ratchet wrench with the other hand. Allow the water to run at least 1 minute through the system to flush the sample tube. Keep the pressure in the system as high as possible (it is safe up to 10 bars). Watch the tubing near the valve for bubbles. Bubbles do preferentially form near fittings. If bubbles are present, tap on the tube to dislodge the bubbles. You may also try to increase the pressure further by reducing the flow through the copper tube by partially closing the back pressure valve. During flushing, bang the side of the aluminum channel with the wrench handle to remove trapped air bubbles from the copper tube. Watch again the tube between the valve and the sample container for bubbles. Make sure that the sample container was flushed at least 1 minute with bubble-free water. If you cannot avoid formation of bubbles, take the sample anyway, and mark the sample container accordingly.
3. SEALING
Once flushing is complete and no air bubbles appear in the tubing, the copper tube may be closed off. Tighten the clamp which is closer to the pressure valve (top clamp, outflow) first. Tighten each screw a little at a time until the outer edges of the clamp touch. You have tightened the clamps sufficiently when you notice that it is getting much harder (almost impossible) to tighten the clamp further. Do not worry, it is not easy to shear the bolts. The clamp will bow somewhat around the copper, so that it maintains a constant pressure on the copper seal. Watch the plastic tubing for bubbles while tightening the top clamp. Tighten the bottom clamp and remove the plastic tubing. If you think there are bubbles inside the copper tube after it has been clamped, write "BUBBLES?" on the aluminum channel. Remove the pressure valve.
4. SAMPLER STORAGE
Shake the sample container a little to remove the excess water from the ends. If the water is very corrosive (high salt content), rinse the inside of the copper tube ends by spraying low salinity water into them and shaking out the excess.
Sampler should be returned to the box immediately after cleaning and then stored out of the weather with the open side of the channel facing up. The ends of the copper tube are fragile after the tube is clamped shut.
Points to Remember
- Avoid bubbles.
- Close clamp at outflow end first.
- Copper tube ends are fragile after clamp is tight.
- If you think there are bubbles inside the copper tube after it has been clamped, write "BUBBLES?" on the aluminum channel.
- Make sure that the sample container is properly marked (date, time, location).
- Take duplicates!
Good Luck!!!