|
Data Sets |
|
Data Sets |
6.Select Data|Edit Data Sets… and enter the following values for the default formulas.
Data Set |
Default Formula |
Kx |
1.5E-5 |
Ky |
1.5E-5 |
Kz |
1.5E-7 |
Porosity |
0.22 |
Specific_Storage |
0 |
Longitudinal_Dispersivity |
2000 |
Horizontal_Transverse_Dispersivity |
50 |
Vertical_Transverse_Dispersivity |
50 |
Initial_Head |
380 |
Chemistry_Initial_Solution |
2 |
Chemistry_Initial_Equilibrium_Phases |
2 |
Chemistry_Initial_Surface |
2 |
Chemistry_Initial_Exchange |
2 |
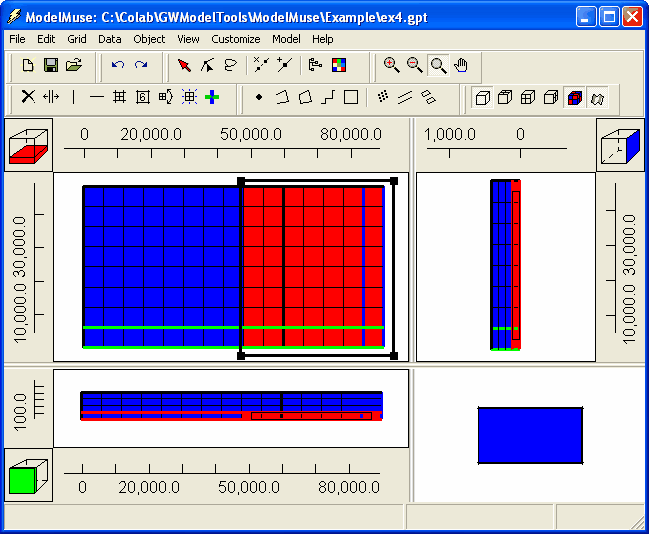
7.In this example, the bottom layer to the east of an X coordinate of 48000 is inactive. To set this, draw an object on the top view of the model enclosing this area (fig. 53). In the Object Properties dialog box, leave the Elements radio button checked, set the object’s Name to “Inactive_Area”, check the Set values of enclosed elements checkbox and set the Higher Z-coordinate to 100. On the Data Sets tab, check the checkbox for the Active data set (under "Required|Hydrology") and set its formula to “False.” After closing the Object Properties dialog box, color the grid with the Active data set and set the selected layer to the bottom layer. Check that the inactive area is restricted to the bottom layer (fig. 53). Using the mouse cursor, right click on the top view of the model and select Hide Selected Objects to hide the “Inactive_Area” object.

Figure 53. Active (blue) and inactive (red) areas in example.