Simple Model: Wells |
Simple Model: Wells |
The next step is to specify the wells. There are 12 wells on layer 1, 2 wells on layer 3 and 1 well on layer 5. Make sure the selected layer is layer 1. Select Object|Create|Point  and click on column 8 row 9 in the top view of the model to create the first well. (The column and row of the cell beneath the cursor are displayed on the status bar.) In the Object Properties dialog box, go to the MODFLOW Features tab and check the check box for the WEL package. Change the Pumping rate interpretation from Calculated to Direct. Enter a Starting time of 0, an Ending time of 86400 and a Pumping rate of -5. (Negative rates mean that water is being pumped out of the aquifer.) Click OK to close the dialog box. To check that the well pumping rate has been assigned correctly, color the grid with the well pumping rate.
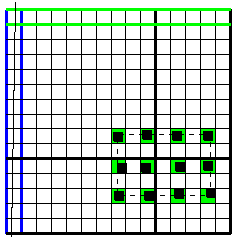
It would be possible to specify the rest of the wells on layer 1 in the same way but because all these wells are identical, there is an easier way. Select Object|Edit|Add Point Sections . Then click on each of the cells that should be a well in the top layer. When you are done, your model should look similar to the figure below. All twelve of these wells are defined by a single object composed of 12 separate points.

Wells in layer 1.
Now make layer 3 the selected layer. We will need two identical wells on this layer. To make them, we will first create one of the wells. Then we will copy it to the clipboard. Next, we will then move the well to another location and then paste the original well from the clipboard to the grid to recreate the well at the original location. Select Object|Create|Point  and click on in column 6, row 4 to make another well. It will have the same times and pumping rate as the others. Select Edit|Copy
  to copy the object to the clipboard. Select Object|Select Objects
  and drag the well object on column 6, row 4 to column 12, row 6. To drag the well object, click down on it, drag it with the mouse button held down and then release the mouse when you reach the correct location. Select Edit|Paste
  to paste the object on the clipboard back into column 6, row 4.
Finally make layer 5 the selected layer. Select Object|Create|Point  and click on in column 11, row 5 to make another well. It will have the same times and pumping rate as the others. Change the selected layer and on each layer check that the wells are in the right places. There should be 12 wells on layer 1, 2 wells on layer 3 and 1 well on layer 5.